Ionic 2 Tutorial Part 1
10 min · 1928 words
Photo Storage Tutorial Part 1
Using Ionic 2 and Firebase 3 to store your photos in a relatively secure location
GitHub repo for this tutorial at https://github.com/dually8/Ionic2-Workshop
So, I initially made this workshop/tutorial thing for work, but since I started a blog, a friend/colleague of mine said I should put it here. So, here we go. Let’s look at what you’ll be making, first.
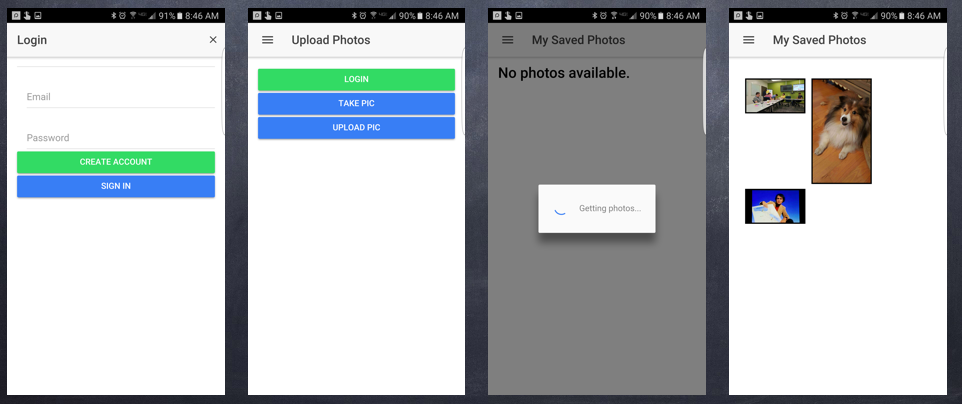
Essentially, we have a login page with email and password, a main page for taking photos and uploading them, and a secondary page for viewing your saved photos (which pulls from Firebase).
Set up
Environment Set up
One of the first things we need to do is to set up our environment. So, if you don’t already have Ionic 2, install it via npm.
[sudo] npm i -g ionic@beta
Second, download the repo for this project by entering
git clone https://github.com/dually8/Ionic2-Workshop.git
Next, cd into the project directory and run [sudo] npm install to install all the dependencies.
Firebase Set up
First, you’ll want to go to https://firebase.google.com, sign up, and create a new project.
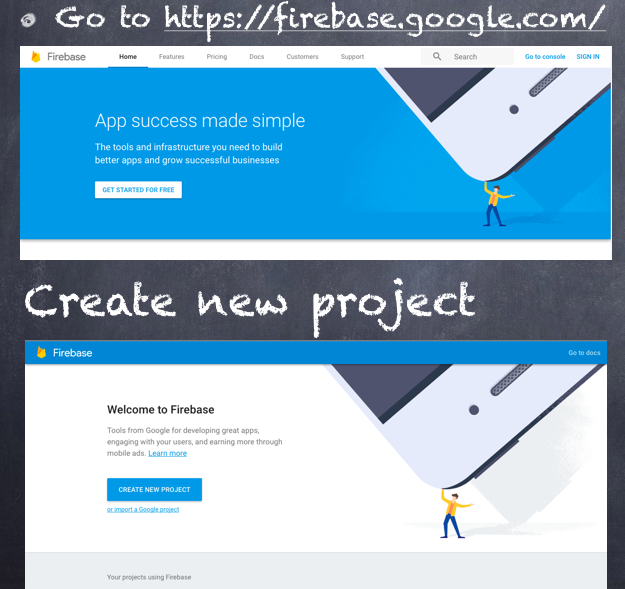
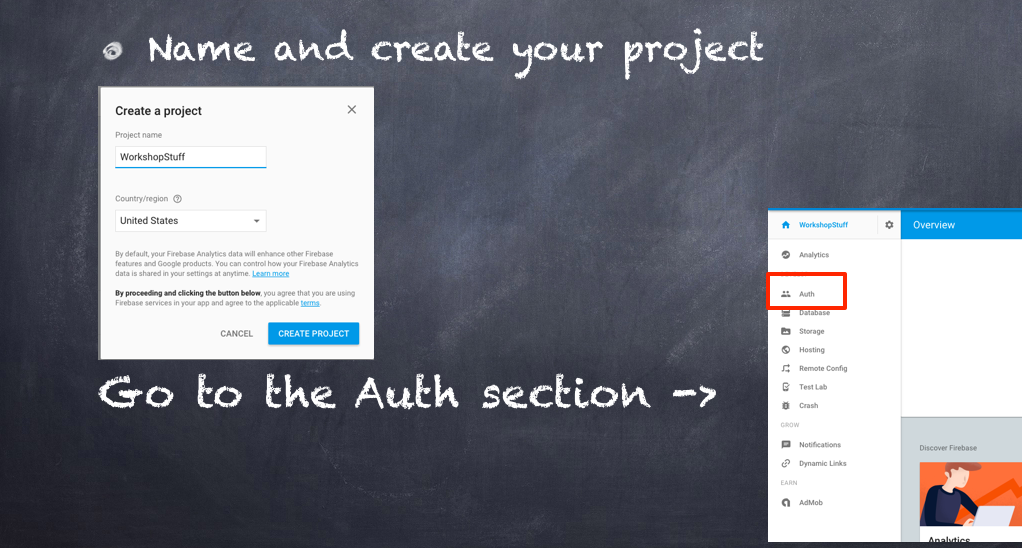
From there, you’ll want to name and create the new project. Afterwards, go to the Auth section of your dashboard.
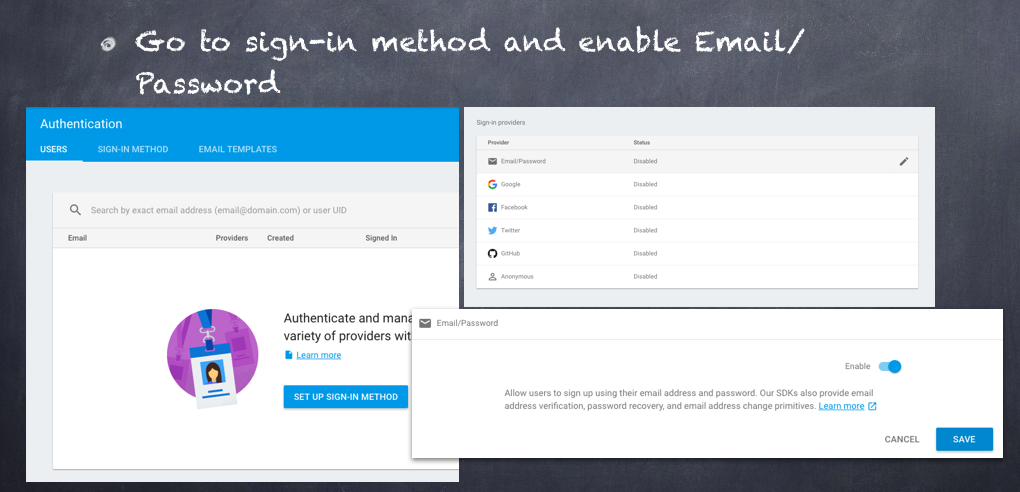
Next, click the Sign-in Method tab and enable Email/Password authentication.
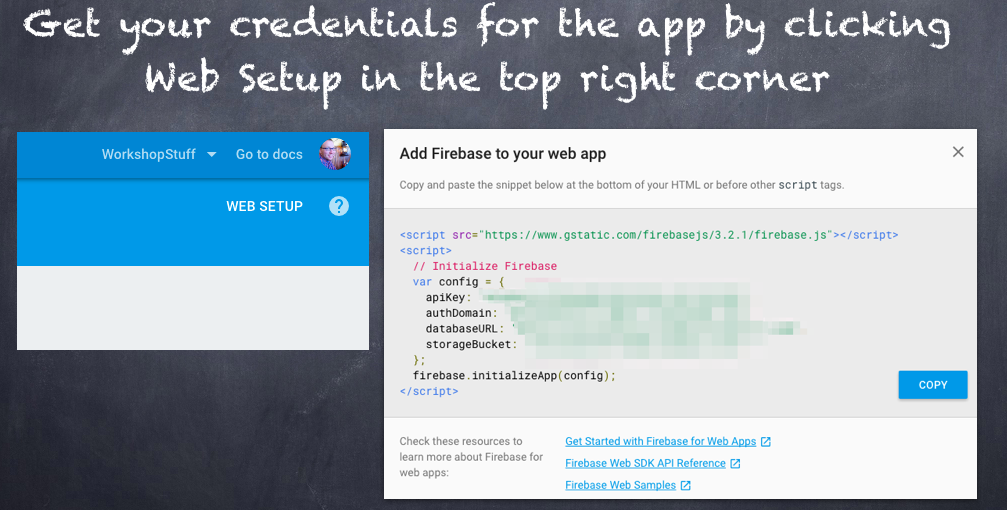
Finally, go to the upper right hand corner, click Web Setup to get your credentials. Copy those credentials and save them for later.
Creating the app
Now, I have all the HTML written for you as well as a wrapper provider for Firebase. What I’ll walk you through is filling in the todo parts and explain the how and why (hopefully well).
First thing we need to look at is the main file for the project (app/app.ts). Here we’ll find our first todo. Remember when you saved your firebase credentials? Cool. We’re going to copy and paste that in the config variable. Got that done? Good. Essentially, the config is passed to firebase.initializeApp in order to, well, initialize the global firebase variable. This will allow us to successfully use the FirebaseProvider later to upload/retrieve photos. Nice.
Next, let’s take a look at app/pages/upload-page/upload-page.ts. At the top, we have some cool stuff.
import { Component } from '@angular/core';
import { ActionSheetController, Modal, ModalController, NavController, ToastController, ViewController } from 'ionic-angular';
import { Camera, CameraOptions } from 'ionic-native';
import { FirebaseProvider } from '../../providers/firebase-provider/firebase-provider';
If you’re unfamiliar with import statements, essentially, we import stuff we want to use in this particular file. This is similar to the node/requirejs require() function. In this case, we import Component from the angular core so that we have access to the @Component decorator. Decorators take metadata objects as arguments. We’ll get more into that later. We also have several controllers imported from ionic as well as a couple of camera things from ionic-native. Basically, these lines are allowing us to use these modules/providers/etc. inside of this particular file.
Now, on to the @Component decorator.
@Component({
    templateUrl: 'build/pages/upload-page/upload-page.html'
})
Here, we’re telling angular that the class we’re declaring after this is a Component and should be treated as such with the metadata we give it. We’re saying here that UploadPage is an angular Component that uses upload-page.html as its view. You can read more about decorators here.
In the constructor we’ve injected some controllers and providers for later use. We’re injecting ModalController to show a login pop up, ActionSheetController to let the user select whether they want to take a photo with their camera, or pick one from their gallery. We’re also injecting ToastController to show toasts (or pop ups, if you will) to the user on successful uploads, and we’re also injecting FirebaseProvider in order to upload said photos.
Now, let’s look at the first todo in this file.
showLogin(): void {
    if (!this.loginModal || !this.loginModal.isLoaded() || !this.loginModal.isLast()) {
        // todo: create and show modal
    }
}
We can create and display the modal by using the ModalController. Since we already have a variable above our constructor to hold the modal, let’s use that to create and present the modal. You can create and present the modal like so:
this.loginModal = this.modalCtrl.create(LoginModalPage);
this.loginModal.present();
In the if statement before this, we’re essentially checking first to see if the loginModal is created at all. If it has already been created, is it showing already? If so, we don’t want to re-create it and re-show it, otherwise we could have over 9000 modals on top of one another. Ekk.
On to the next todo…let’s create the login function for our app. Find the login function inside of class LoginModalPage. Now, we want to authenticate the user for uploading pictures via email/password, and we probably want to show some sort of pop-up that tells them whether or not their login attempt succeeded. So, let’s check out FirebaseProvider for a wrapped login function that we can use. In FirebaseProvider we have a function that returns a promise, loginWithEmail. Sounds like that’ll work, so let’s.
this.fbProv.loginWithEmail(this.email, this.password)
    .then((res) => {
        // success
    }).catch((er) => {
        // fail
    });
Now, inside of these callbacks, we should let the user know what happened after the login attempt. We’re going to use a Toast in order to accomplish this. We can create an show a toast like so:
this.toastCtrl.create({
    message: 'Your message here',
    position: 'middle', // options: "top", "bottom", "middle"
    duration: 3000 // 3 seconds
}).present();
We can create and chain the present function for our toast so we don’t have to store something in a variable. Pretty nifty. Alright, next, we should show some meaningful messages to the user after the login attempt. Feel free to use what I’ve done below:
this.fbProv.loginWithEmail(this.email, this.password)
    .then((res) => {
        this.toastCtrl.create({
            message: 'Login successful!',
            position: 'middle',
            duration: 3000
        }).present().then(() => {
            this.dismiss(); // dismiss the modal
        });
    }).catch((er) => {
        // putting in a variable here so we can set the message
        // depending on what we get back from firebase
        let toast = this.toastCtrl.create({
            message: '',
            position: 'middle',
            duration: 3000
        });
        if (er.message) {
            toast.setMessage(er.message);
            toast.present();
        } else {
            toast.setMessage(JSON.stringify(er, null, 2));
            toast.present();
        }
    });
Okay, so, we’re almost at a place where we can test this stuff. One more thing to go. Take a look at the next todo, createAccount. If it’s not obvious, we need to create an account using the email and password the user has entered, then proceed to log them in using the new account. If we take another look into FirebaseProvider, we’ll see a handy dandy createAccount function ready for us to use. So, let’s wire that up like so:
this.fbProv.createAccount(this.email, this.password)
    .then((res) => {
        // log them in after succesfully creating new account
        this.login();
    }).catch((er) => {
        let toast = this.toastCtrl.create({
            message: '',
            position: 'middle',
            duration: 3000
        });
        if (er.message) {
            toast.setMessage(er.message);
            toast.present();
        } else {
            toast.setMessage(JSON.stringify(er, null, 2));
            toast.present();
        }
    });
Alright, you’re ready to go ahead and test the login functionality. Try to test that now, if you like. You can test in the browser by running ionic serve, or by running it on a device/emulator. You can read more about the ionic CLI here.
Hopefully, that worked out well for you, if not, feel free to put in an issue on this post’s repo.
Next, let’s write the functionality for uploading photos. Take a look at the next todo, uploadPic. For this function, we want to upload whatever photo has been taken/selected by the user and upload it to the proper storage place in firebase. Luckily, we have a nice wrapper function in FirebaseProvider for this. Let’s use the uploadPic function in there for this purpose. The camera will output the taken/selected photo as a base64 string (which isn’t ideal and you probably wouldn’t use it in a production app, we can discuss that more later). We have a variable in our class already to hold the value of this and display it to the user if it contains something (see: this.photo). Now, we basically just want to check to see if that photo variable contains anything, and if so, upload it to firebase. Feel free to use the implementation below:
if (this.photo && this.photo.length > 0) {
    this.fbProv.uploadPic(this.photo)
        .then((res) => {
            this.toastCtrl.create({
                message: 'Uploaded photo successfully!',
                position: 'middle',
                duration: 3000
            }).present();
        }).catch((err) => {
            console.error(err);
        });
} else {
    this.toastCtrl.create({
        message: 'No photo to upload.',
        position: 'middle',
        duration: 3000
    }).present();
}
Above that function is a neat little thing Ionic 2 provides for us: ionViewDidEnter. Essentially, it’s a function that gets called when the view enters. You can read more about the ionic view events here. Inside of this, I’ve created a loading screen to show while photos are being retrieved. That way, the user knows something is happening and is not just presented with an empty screen. Below the presentation of the loading screen is an if statement that checks to see if we have a user currently logged in. If so, we get the photos they’ve stored, otherwise, we just hide the loading screen.
Feel free to go ahead and test this on a device now. You’ll have to test it on a device or emulator because the browser does not support the cordova camera plugin. I recommend using Genymotion for emulating android devices, myself.
Again, hopefully everything worked out for you. If so, continue on to the next step, otherwise, open up an issue on my git repo.
So, we have a working login and photo upload now. Sweet. Next, we want to be able to view the photos we’ve stored in firebase. Proceed to open app/pages/view-page/view-page.ts for the next todo on our list.
In the getPhotos function in here, let’s call firebase to retrieve all the photos we have for the current user. FirebaseProvider has a nice little wrapper function for your convenience again (getPics). We need to also make sure the promise is resolved or rejected depending on what we get back from firebase. Feel free to use my implementation below:
return new Promise((resolve, reject) => {
    this.fbProv.getPics()
        .then((photos) => {
            // store returned photos into view's photos
            this.myPhotos = photos;
            resolve();
        }).catch((er) => {
            console.error(er);
            reject();
        });
});
Feel free to test this in your app now. It should work in the browser if you decide to go that route. If you run into an issue, feel free to open an issue in this git repo.
That’s it for part 1. In part 2, we’ll look at unit testing our application.
Notes
- The reason we generally wouldn’t use a base64 string to store photos is because today’s cameras are really good, therefore, the size of the string could be over 3 million characters for a single photo. That takes a lot of memory to render, so generally, you’d want to point the photos to a location on the device and just upload the binary data later.
- We use a firebase database in this because it’s relatively easy to store and retrieve the base64 strings. Realistically, you’d want to store photos and other large binary files in firebase’s storage since it allows for more space. The database has the potential to fill up space very quickly, especially with high quality photos.
- Most of the photos used here are taken from my slideshow from the workshop I gave. I’d be happy to post those if there’s enough interest.